
We’ve been asked to provide a descriptive overview of how the relationships graph in SeedCode Complete is structured and why. So I’ll try to do that without getting into too much technical detail, or philosophy. (For some of the philosophy here, checkout Jason’s posts on the origins of the Selector Connector pattern and why he chose “cards” as the design metaphor in Complete.)

There are four distinct models in use on the SeedCode Complete graph:
- anchor-buoy
- separation of data and interface
- selector-connector
- virtual list
Anchor-Buoy
This is a well established graph model that should be very familiar to any FileMaker developer. Countless FileMaker solutions built since FileMaker 7 feature multiple anchor-buoys or “TOGs” (table-occurrence groups), where each “anchor” represents a “base table”, and is connected to multiple “buoys” (usually positioned to the right of the anchor), representing instances of other tables as they relate to that anchor. FWIW, I always loved the term “squid”, which for some reason never quite caught on as an alternative name.
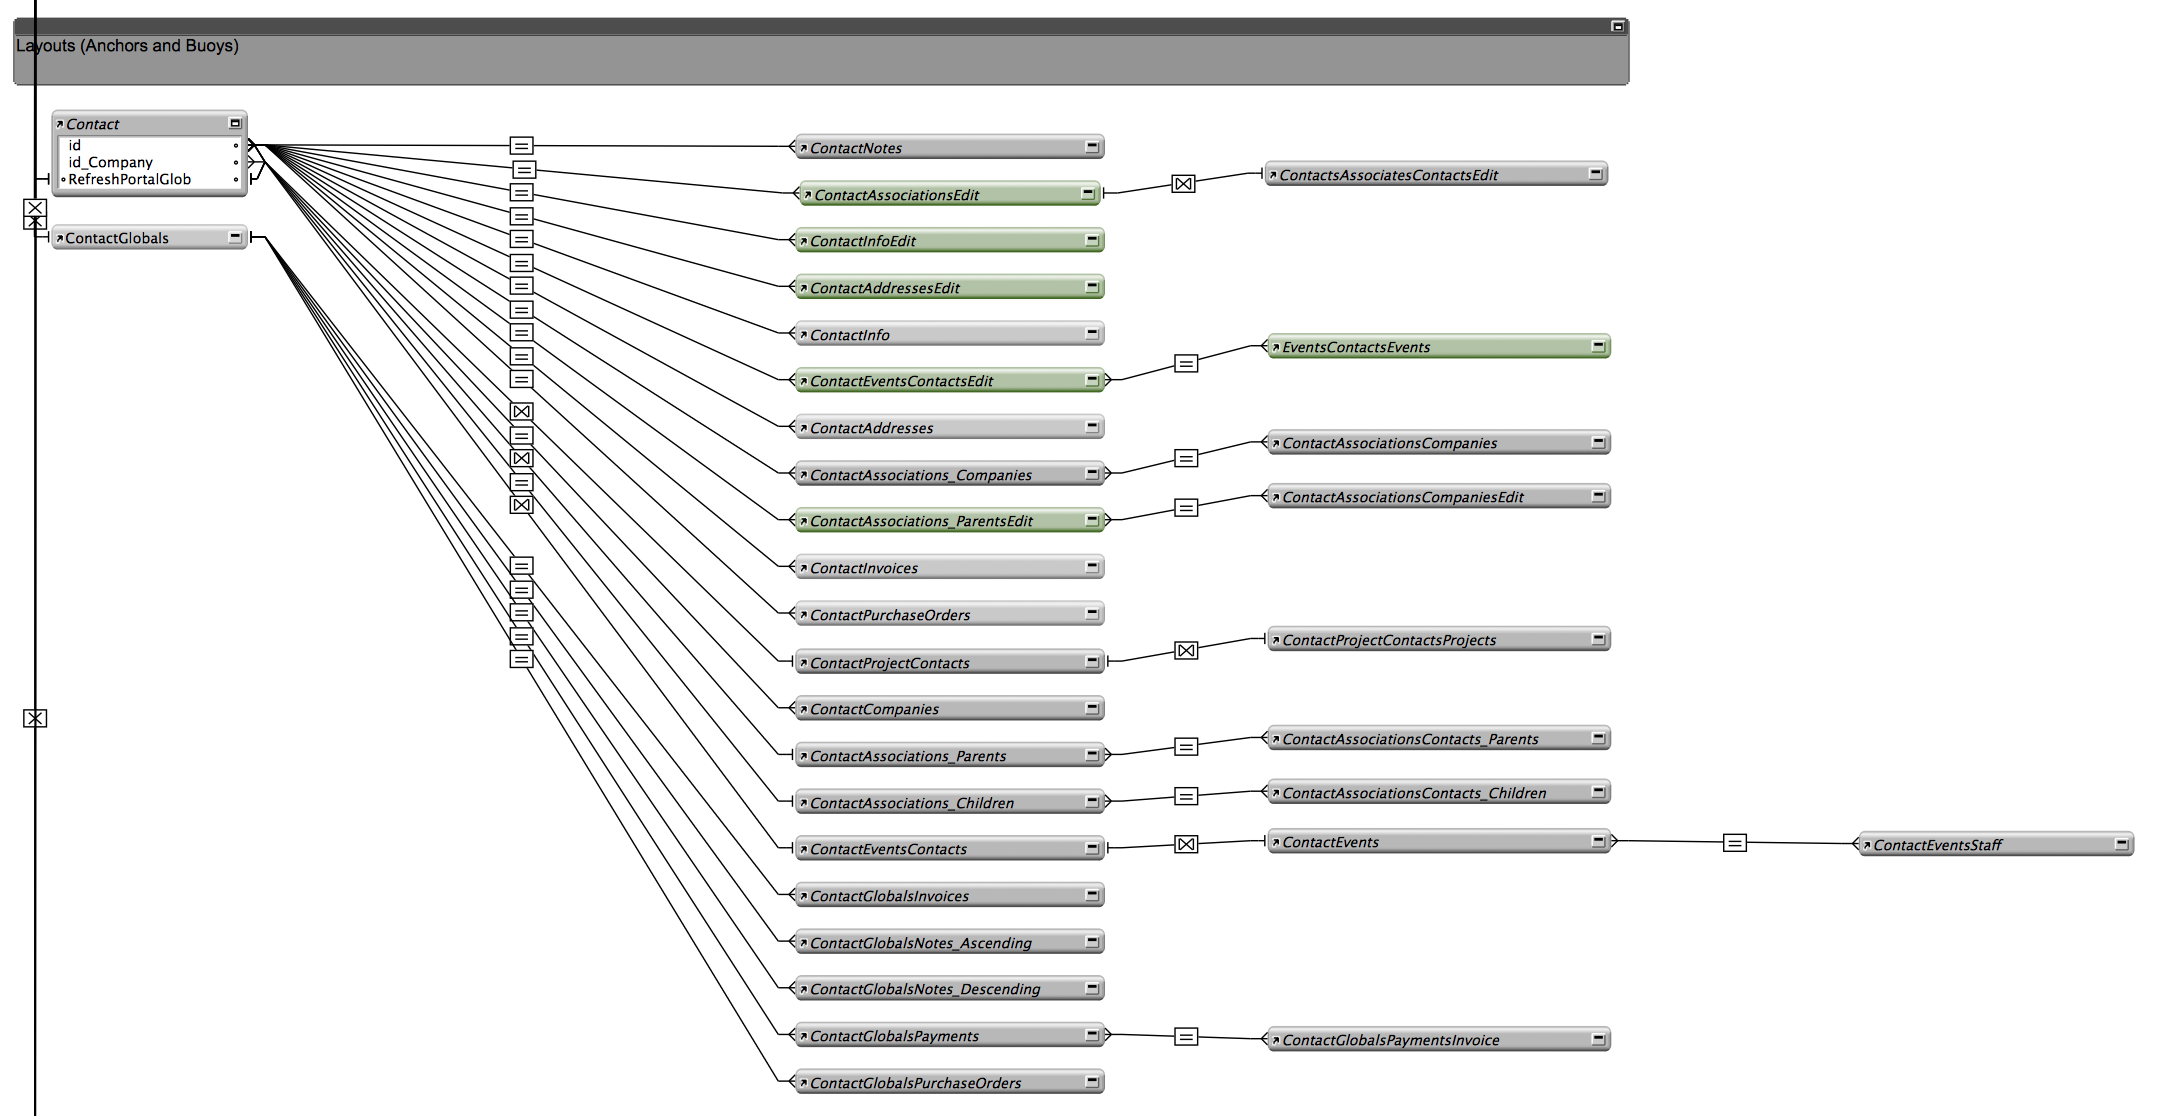
On the SeedCode Complete graph, you’ll find the familiar anchor-buoy pattern starting below the “Layouts (Anchors and Buoys)” text note. The first one has the “Contact” base table as the anchor, with numerous connected buoys off to the right (ContactNotes, ContactAssociationsEdit, etc.). Two things may seem odd there: the vertical relationship line connecting Contacts to other “base table” TOs, and what seems to be a separate TOG, starting with the “ContactGlobals” TO, just below Contact. That vertical line connects all of the base tables to the Connector TO (see the “Selector Connector” section below). The ContactGlobals table contains the global fields that would otherwise be in the Contacts table (see the “Separation of Data and Interface” section below). Its buoys facilitate searchable portals featuring “type-ahead” on the main Contacts layout (e.g., “ContactGlobalsNotes_Ascending”).
Separation of Data and Interface
AKA “the separation model”, mainly aims to have data tables contain only data fields (text, number, date, time, timestamp and container), while fields that are strictly used for interface (typically globals) would go in tables dedicated for that purpose. Often the data tables and the interface tables are in separate files, which can make updating your solution a breeze for some types of deployments. The theory is that all ongoing development is done in the interface file (scripts, layouts, relationships, calculation fields, etc.), while the data file schema doesn’t change. That way an update just involves swapping out the interface file. No need to import data, no user interruptions.
All of the “anchor” TOs described above represent data tables, which are all stored in the SeedCodeModel file (that’s our data file). Many of the table occurrences on the graph in the SeedCodeComplete file (that’s our interface file) are for local tables containing only global fields (Home, SelectorFilters, SettingGlobals, etc.).
SeedCode Complete also uses a Control file which isn’t really a data file, but isn’t technically an interface file either: think of it as an interface file that only scripts use. In other development environments, the Control file would be the “controller” part of a Model-View-Controller architecture. In FileMaker it’s useful because it lets developers run scripts in this Control file–scripts that may need to navigate to new layouts, etc–without losing focus on where the user is at in the interface file. That may seem like a small benefit for adding a whole new file to your solution, but keeping the layout hopping in the Control file is one reason why SeedCode Complete feels to smooth, even on WebDirect.
More on why we use separation in Complete can be found in our docs here.
Selector Connector
This technique has been gaining a lot of traction recently in blog posts, videos and DevCon sessions, mainly coming from Todd Geist and SeedCode’s Jason Young. Even FileMaker, Inc. has recognized its significance with a “development leadership” award given to Geist Interactive this past July in Las Vegas. Follow some of those links for much better explanations than I could give, and way more detail than this post has space for. The main benefit of using Selector-Connector in SeedCode Complete comes when extending SeedCode Complete by adding a new module, for example. That’s because when you copy/paste field objects from one layout to another, those objects’ field associations remain intact. One such application is with “pickers”, used extensively in SeedCode Complete to search for records in another table to establish a link between records in related tables.
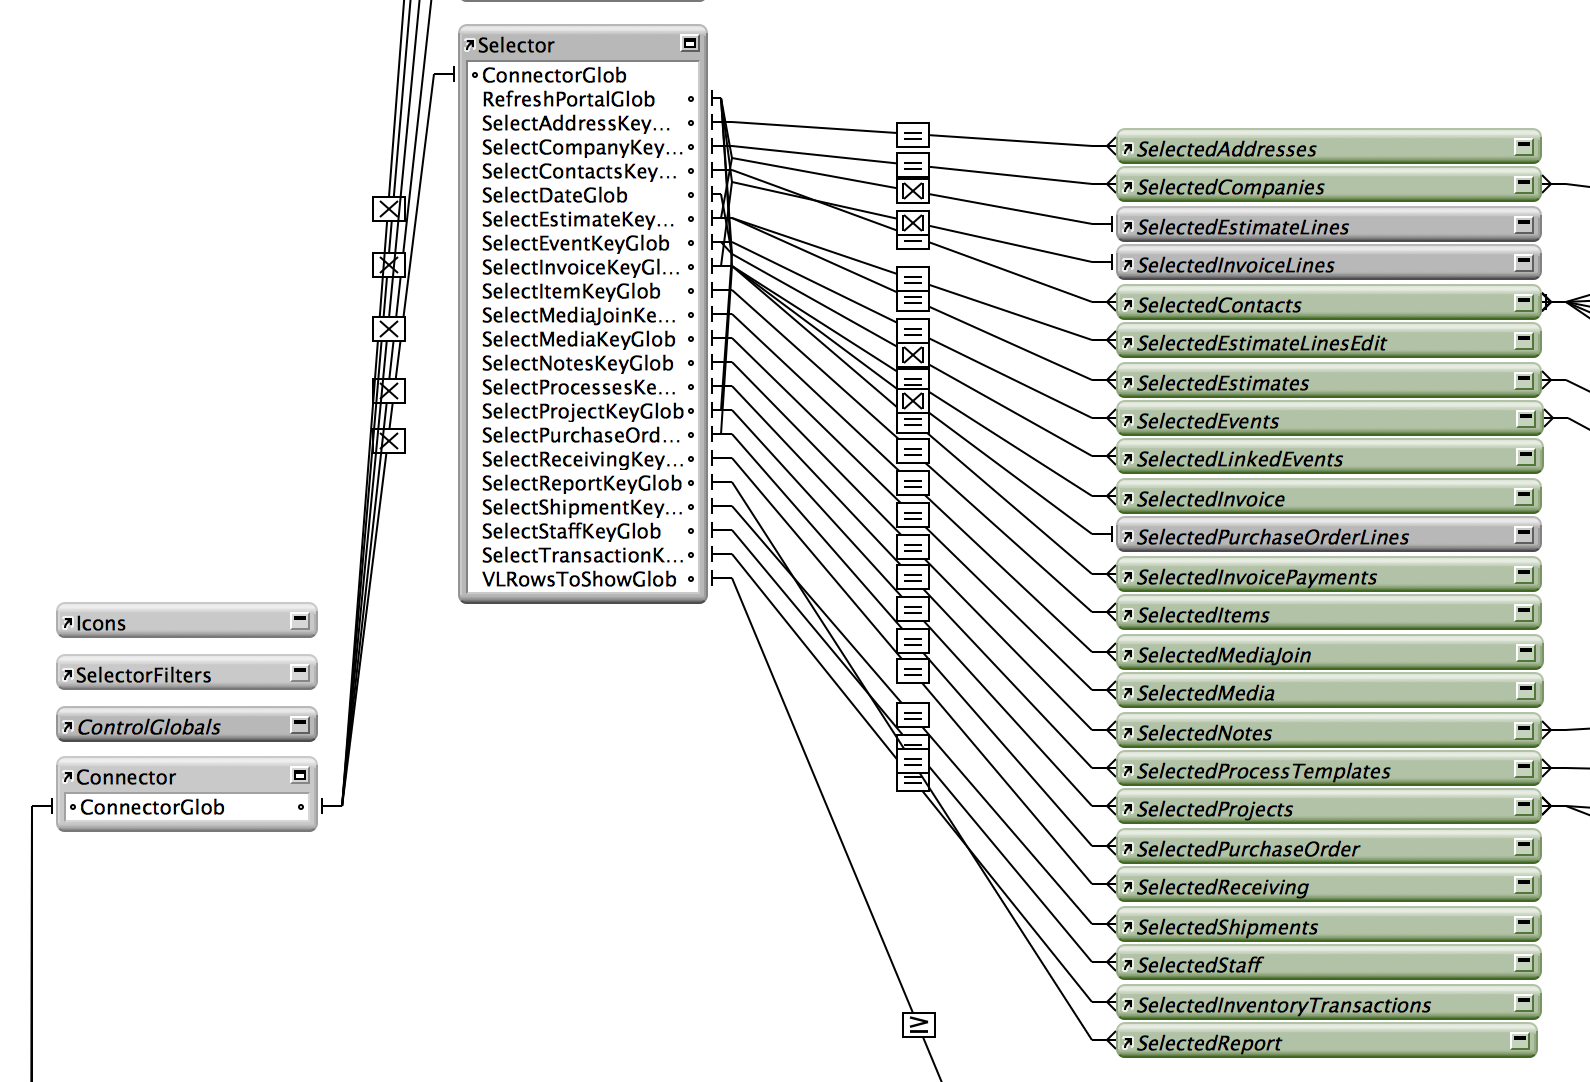
As mentioned previously, all of the base tables are related to the “Connector” TO, which in turn is linked to the “Selector” TO (and others). An instance of each data table is linked to the Selector TO via a global primary key, which allows for a direct link to any individual record in any of those tables from virtually any layout.
Virtual List
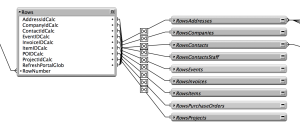
A popular advanced technique, the virtual list is a fast and flexible way to display data from any table in a list view or portal. SeedCode Complete uses virtual lists to display search results on the home screen. The “Rows” anchor TO and linked buoy TOs (RowsAddresses, RowsCompanies, etc.) support the virtual list technique in SeedCode Complete.
Using Virtual List means there aren’t a ton of little table occurrences everywhere you might need a portal of contacts or open projects. This, combined with the selector-connector pattern for making virtual rows accessible from anywhere, really reduces the number of table occurrences on the graph: and means there are likely fewer table occurrences for you to create as you make new modules.
For a nice introduction to Virtual List, check out our virtual list example file.
Conclusion
The relationship graph in SeedCode Complete is large and may seem complex at first. But when you recognize the methods described in this article, you’ll find it’s very well organized and follows a predictable pattern, with easy-to-understand naming conventions. Thus, adding a new module, while not a trivial process, is mostly an exercise in duplicating and renaming tables, fields, TOGs on the graph, scripts and layout elements. With a little patience you’ll end up with a new module that matches SeedCode Complete’s design and UX standards, and that can be custom tailored to suit your needs.
Of course we recognize that not everyone has the patience and attention to detail required to add a new module into SeedCode Complete, so we are here for you and happy to help. Feel free to get in touch so we can help you customize SeedCode Complete into the perfect solution for you.


5 Comments
I noticed the slow-down under load testing as well and wondered if you had ever looked at this type-ahead portal filtering implementation by Nightwing that is my opinion blindingly fast. http://www.nightwing.com.au/FileMaker/demosX/demoX03.html
john – really helpful precis.
does the control file run on or off-screen then??
It runs in a “hidden” (un-drawn?) window. So the user experience is the same as an offscreen window. But the *debugging* experience is better since the window isn’t off screen: if you stop a script and call focus to the window, for example, you can actually see where you are =)
Nice summary but you omitted to credit Bruce Robertson who invented and donated the virtual list technique to the world.
Using virtual lists as the means of displaying results from many tables in a single Ui is a good albeit complex technique until the lists become long when the list building overhead becomes too much of a performance load on mobile.
Our research indicates that the ultra narrow single table technique, being essentially very simple, provides better performance.
Cheers, Nick
Bruce is the man. I know the “five point palm exploding heart technique” but what’s the “ultra narrow single table technique”?