This post will show you how to schedule GoToMeetings from DayBack Calendar using the new cURL and JSON functions in FileMaker 16, as well as how to do it in JavaScript if you’re using DayBack Online.

Custom actions in DayBack let you add your own buttons to your events in the calendar. These buttons run your own FileMaker scripts and are a great way to extend the calendar’s capabilities. One great way to use Custom Actions is to interact with third party applications that have an available API (Application Programming Interface), like GoToMeeting.
Overview: GoToMeeting and FileMaker
I’ve been scheduling meetings in GoToMeeting quite a lot since I started at SeedCode. I’ve always done it manually, either by starting a quick meeting right before it was scheduled, or by creating it in the GoToMeeting app, copying that data into DayBack, and then sending the details to the customer.
Since DayBack is the shared calendar we use to manage SeedCode, it didn’t make sense to be duplicating work, both in GoToMeeting and DayBack. One quick search led me straight to GoToMeeting’s API documentation, so I set out to make some custom actions that would allow me to do all the scheduling, rescheduling, canceling and starting meetings directly in DayBack.
Here’s a video of it in action: https://vimeo.com/221944155
First: Getting an API Key for GoToMeeting
In order to permit DayBack to communicate with GoToMeeting, you’ll need to create a custom app and generate an API auth token. Both of these tasks are completed with your GoToMeeting account and are as simple as filling out a form. For more instructions on creating an app and generating your auth token, see the GoToMeeting API Getting Started documentation here: https://developer.citrixonline.com/how-create-developer-app
Option 1: Using DayBack Online
Custom Actions in DayBack Online are written in JavaScript. The custom actions I wrote for GoToMeeting take advantage of jQuery and AJAX for the functions that communicate with the server.
The fully featured DayBack Online – GoToMeeting integration requires 3 custom actions and 3 event actions, giving you conflict detection and resolution, and making sure rescheduled events are synced to GoToMeeting.
If you’re not interested in all those features, I’ve included a simple version of the CreateGTM script that will just check if the event is in the future and schedule the meeting.
Here’s the list of files you’ll need in the next step (download them here):
- CreateGTM – Custom Action – Handles the creation of new meetings
- CreateGTMSimple (Optional) – Custom Action – Simple create meeting function
- DeleteGTM – Custom Action – Handles the manual deletion of existing meetings
- EventClick – On Event Click Event Action – Saves the event’s scheduled time before editing for use in the EventSave script
- EventDelete – On Event Delete Event Action – Checks if GTM details exist and prompts to delete meeting
- EventSave – On Event Save Event Action – Checks if the event time has changed and prompts to update GTM accordingly
- StartGTM – Custom Action – Starts a meeting if the details exist in the event description
Add these scripts to your DayBack Online account by going into the Administrator Settings, choosing your calendar source (this works with Google and FileMaker sources) and pasting each file’s contents into a new event or custom action field. For the event actions, you select the type of action with the dropdown. For custom actions, you just need to give each one the name that you would like to see on the custom action button. For more info, check out our documentation on Custom Actions in DayBack Online.
If you’re adding these to a Google Calendar source the actions you downloaded above are ready to go: all you’ll need to do is add your GoToMeeting API Auth Key into the top line of each script (except for the Event Click action). If you’re adding these to a FileMaker source in DayBack Online you’ll also need to replace each of the fields in [[brackets]] with the field name in your FileMaker table. So [[start]] might become [[DateTimeStart_Calc]]. Note that these start and end fields need to be timestamps (not numbers) so you may need to define new FileMaker fields for these.
That’s it! Return to the calendar and try out your new buttons.
Option 2: Using DayBack for FileMaker
Custom actions in DayBack for FileMaker can either be set to run FileMaker scripts or you can pass in JavaScript to be run when a button is clicked. One difference in DayBack for FileMaker, though, is that there are no Event Actions. All the work when creating, saving or deleting events is done through the FileMaker script “Create, Edit, Delete Event…” that comes with DayBack Calendar.
I had created the JavaScript functions for DayBack Online first, so the next goal was to translate those into FileMaker scripts. And since I needed to send URL requests to the GoToMeeting API, it was a perfect chance to show off FileMaker 16’s new cURL and JSON capabilities. (The demo file and everything which follows requires FileMaker 16. Need a trial version? Get one here.)
The demo file is a fully unlocked 30-day trial of DayBack and ready to use with GoToMeeting custom actions. (Download the demo file) The only thing you’ll have to do is enter your GoToMeeting API Auth Key into the Set Variable step on line 12 of the “Load Calendar Settings – On Startup…” script:
Once you’ve saved that, run the “Upon Opening” script and you’re all set to start playing with the GoToMeeting functions.
Adding the GoToMeeting Actions to Your Copy of DayBack
If you’ve already got your own copy of DayBack, and are using FileMaker 16, you can integrate the GoToMeeting functions into your own file with the following steps:
1. Copy the entire GTM script folder and all contained scripts to your file.
2. Refer to the screenshot above and copy that new first line from the script “Load Calendar Settings – On Startup…” into your version of that script. Be sure to enter your GoToMeeting Authorization Key into the value.
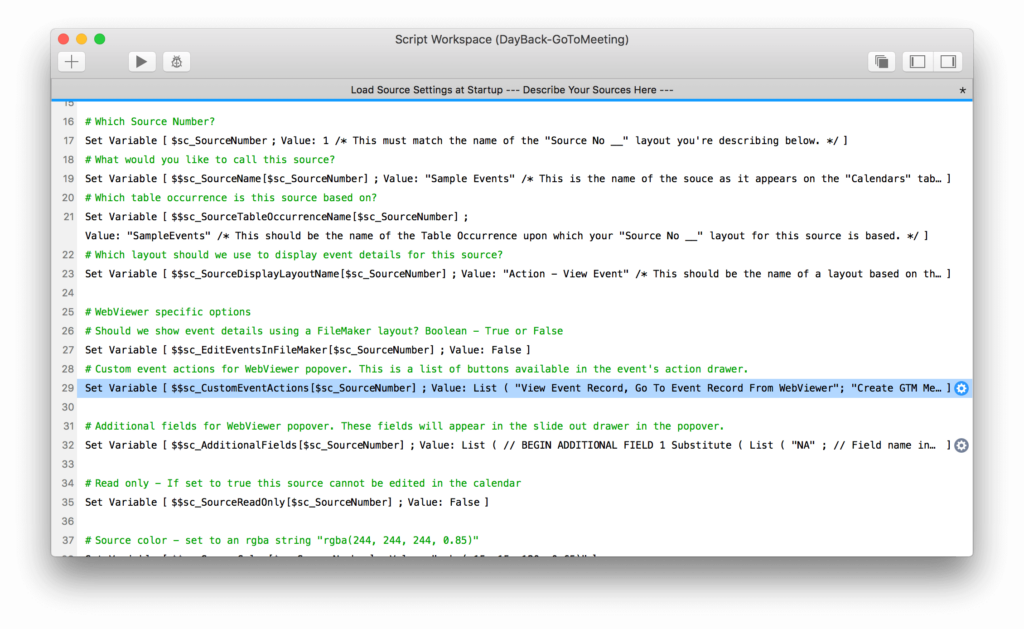
3. In your “Load Source Settings at Startup…” script, under the source number you would like to add the custom actions, find the section commented “Custom event actions for WebViewer popover”…
…and in the Set Value script step on the next line, add the following 3 lines to the calculation:
"Create GTM Meeting, GTM - Create Meeting" ;
"Delete GTM Meeting, GTM - Delete Meeting" ;
"Start GTM Meeting, GTM - Start Meeting" ;
4. Finally, copy the script steps as shown in the images below in the script “Create, Edit, Delete Event…“ from the custom version of DayBack. Paste the script steps into the same script in your file:
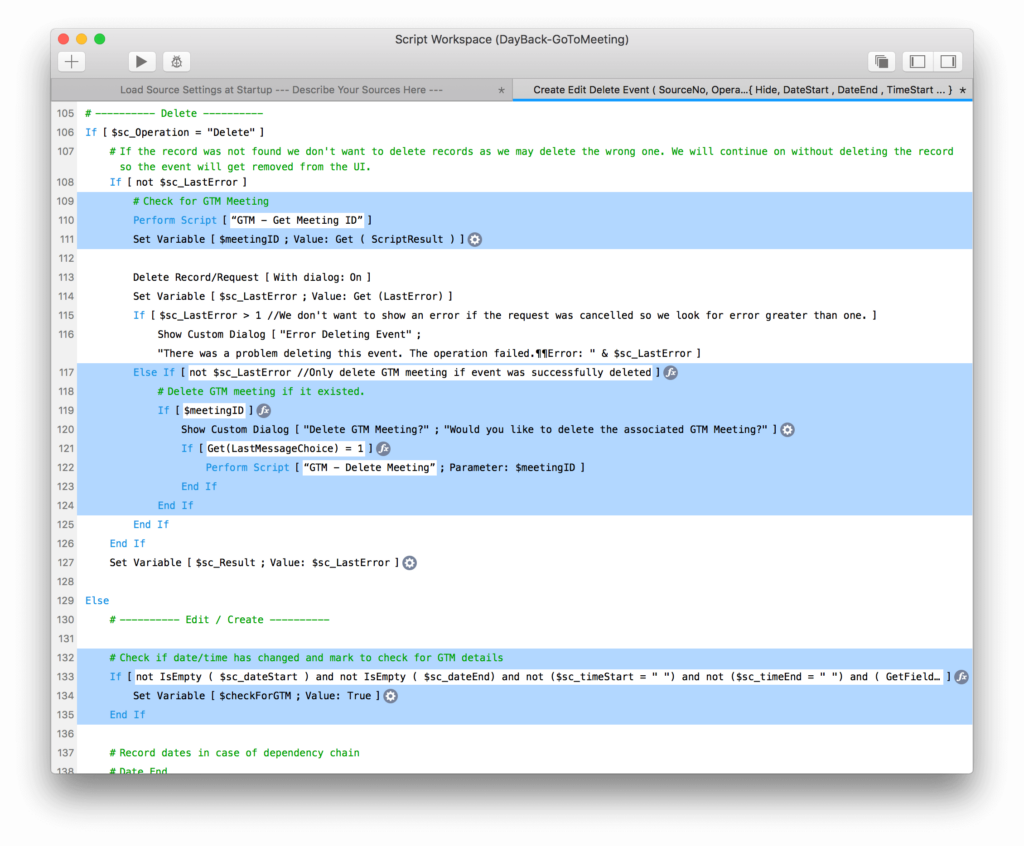
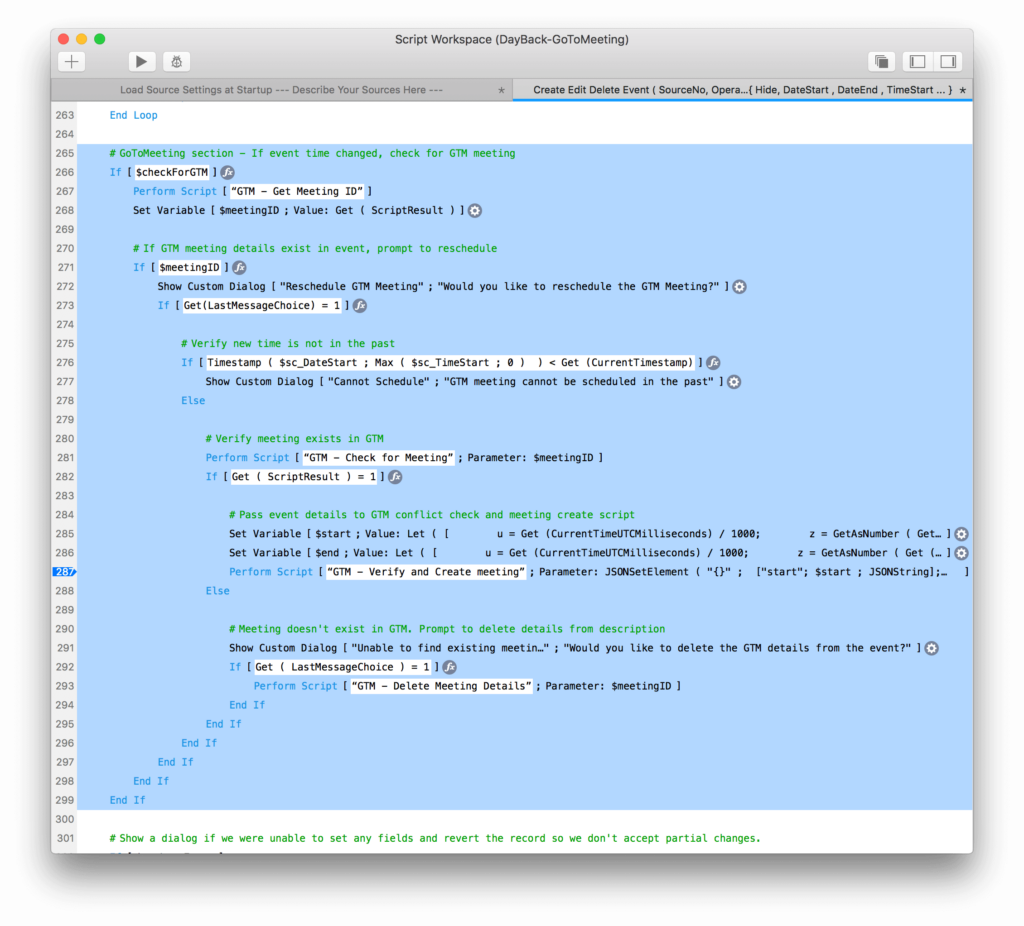
5. Save all your scripts and run the “Upon Opening” script to see your changes take effect. Now you can start using your GoToMeeting custom actions!
Conclusion
DayBack’s custom actions can interact with many different applications. This example shows how comprehensive and fully-featured such custom actions can be. If you’re interested in connecting your DayBack solution to a 3rd party application, but don’t feel up to the task of creating your own actions, we offer Implementation Packages where we can develop these to meet your requirements. If this interests you, please reach out.



4 Comments
Thanks for posting these. So very helpful.
Do all of your plugins work equally well on windows 10 as on the mac? I have been looking at setting up a dedicated server and considering using a windows machine.
Yes, since these technically aren’t plugins–things like DayBack and Complete are just FileMaker files; they don’t have a lot of the platform compatibility issues plugins do. There are very few differences in behaviors between Mac and Win in SeedCode products and even those minor differences are on the client, not the server. So select whichever server platform you’re more comfortable supporting. Our apps are good either way.
Hope that’s good news.
With KC’s and Jason’s help, we’ve just updated the DayBack Online functions to v1.2, including some more error trapping. (Remember, you don’t need these for DayBack for FileMaker–there you’ll find FileMaker scripts using cURL instead.)