If you have a distributed team, you’re painfully aware that there is no built-in support for switching time zones in FileMaker. There’s easy way to have your time fields translate themselves into a different time zone.
DayBack changes that.
By default, DayBack shows events on the calendar at whichever time is entered into your time field. But you can mod the calendar so users can select the time zone in which they want to view their schedule. Edits made in this mode are saved adjusting for the time zone they’ve selected. The mod takes advantage of a Moment.js enabled selector in a web viewer, along with some field and script changes. Detailed instructions and an example file follow below.
Here’s a video of the mod switching time zones in FileMaker:
How It Works
The most important thing to understand when implementing something like this is that the records will need to be saved in a specific “reference time zone”.
In an ummodified calendar, no matter where you are located, when you schedule an event in DayBack for 12:00 PM, that field will be saved as 12:00 PM in the record. A “reference time zone” is your team’s agreement as to what that “12pm” means. For SeedCode, we have users in multiple time zones, but our reference time zone for events is Pacific. The users living outside of the Pacific time zone have just had to manually adjust their events accordingly… until now! Most teams already have such a reference, even if it’s only in your head. In this mod, you’ll make it explicit.
After implementing this mod, if you are in Pacific time and your “reference time” is in Eastern, the field on your event record will actually be saved as 3:00 PM. =)
There’s a bit of work to implement this into your calendar, but you should be able to get there by following these instructions closely. If you run into any issues, please reach out to us.
Downloading the Example File
First, download the example file, try it out, and see if this time zone behavior is right for your team: DayBackTimeZones
You’ll copy a few things out of this example and paste them into your file following the instructions below. You’ll add a new web viewer selector, a layout, scripts, and some DBk_WebViewerSource calculation additions to your file.
Next, Make a backup! Seriously, backups are super important if anything goes wrong or doesn’t work as expected, and this customization can make big changes to how your calendar works. Since this is a fairly major modification to your file, you might also want to consider making the changes to a separate development copy first and testing it out with a small group of users before implementing into your live DayBack file.
Add Switching Time Zones to Your File
1. You’ll need to create a new number type field using Global storage in your CalendarInterface table called “TimezoneReference”. If you are using FileMaker Pro Advanced, you can just copy the field from the example file into your CalendarInterface table.
2. Create a new layout in your file based on the “CalendarInterface” table and copy the contents of the “TimezoneReference” layout from the example file into your new layout. Resize the layout dimensions to match the contents.
3. Exit layout mode and set your reference time. In most cases, you’ll want to click the “Use Server Time” option to set the reference time to your server/host time zone. When set to server time, the scripts and calculations have been set to always base the calculations on the current server time, so even when your server time changes time zones, the calculations will be in reference to its current time.
Unfortunately, this can be an issue if your server location is not consistent, and moves from one-time zone to another. In this case, you’ll want to pick a static time for your reference time. You could choose to stick with GMT by clicking the “Use GMT” button, which sets the value to 0. Since GMT never changes, this will always be consistent. Or, you could enter the time zone offset, in minutes, in the field. Just keep in mind that, if setting a static time manually, you will need to change it manually if Daylight Savings is observed in that time zone.
4. On your file’s “Calendar” layout, delete the existing webviewer_calendar object, copy the webviewer_calendar, webviewer_timezoneSelector, and label_timezone objects from the example file’s “Calendar” layout, then paste them into your layout. Click Yes, when asked to increase the size of the layout to accommodate the objects.
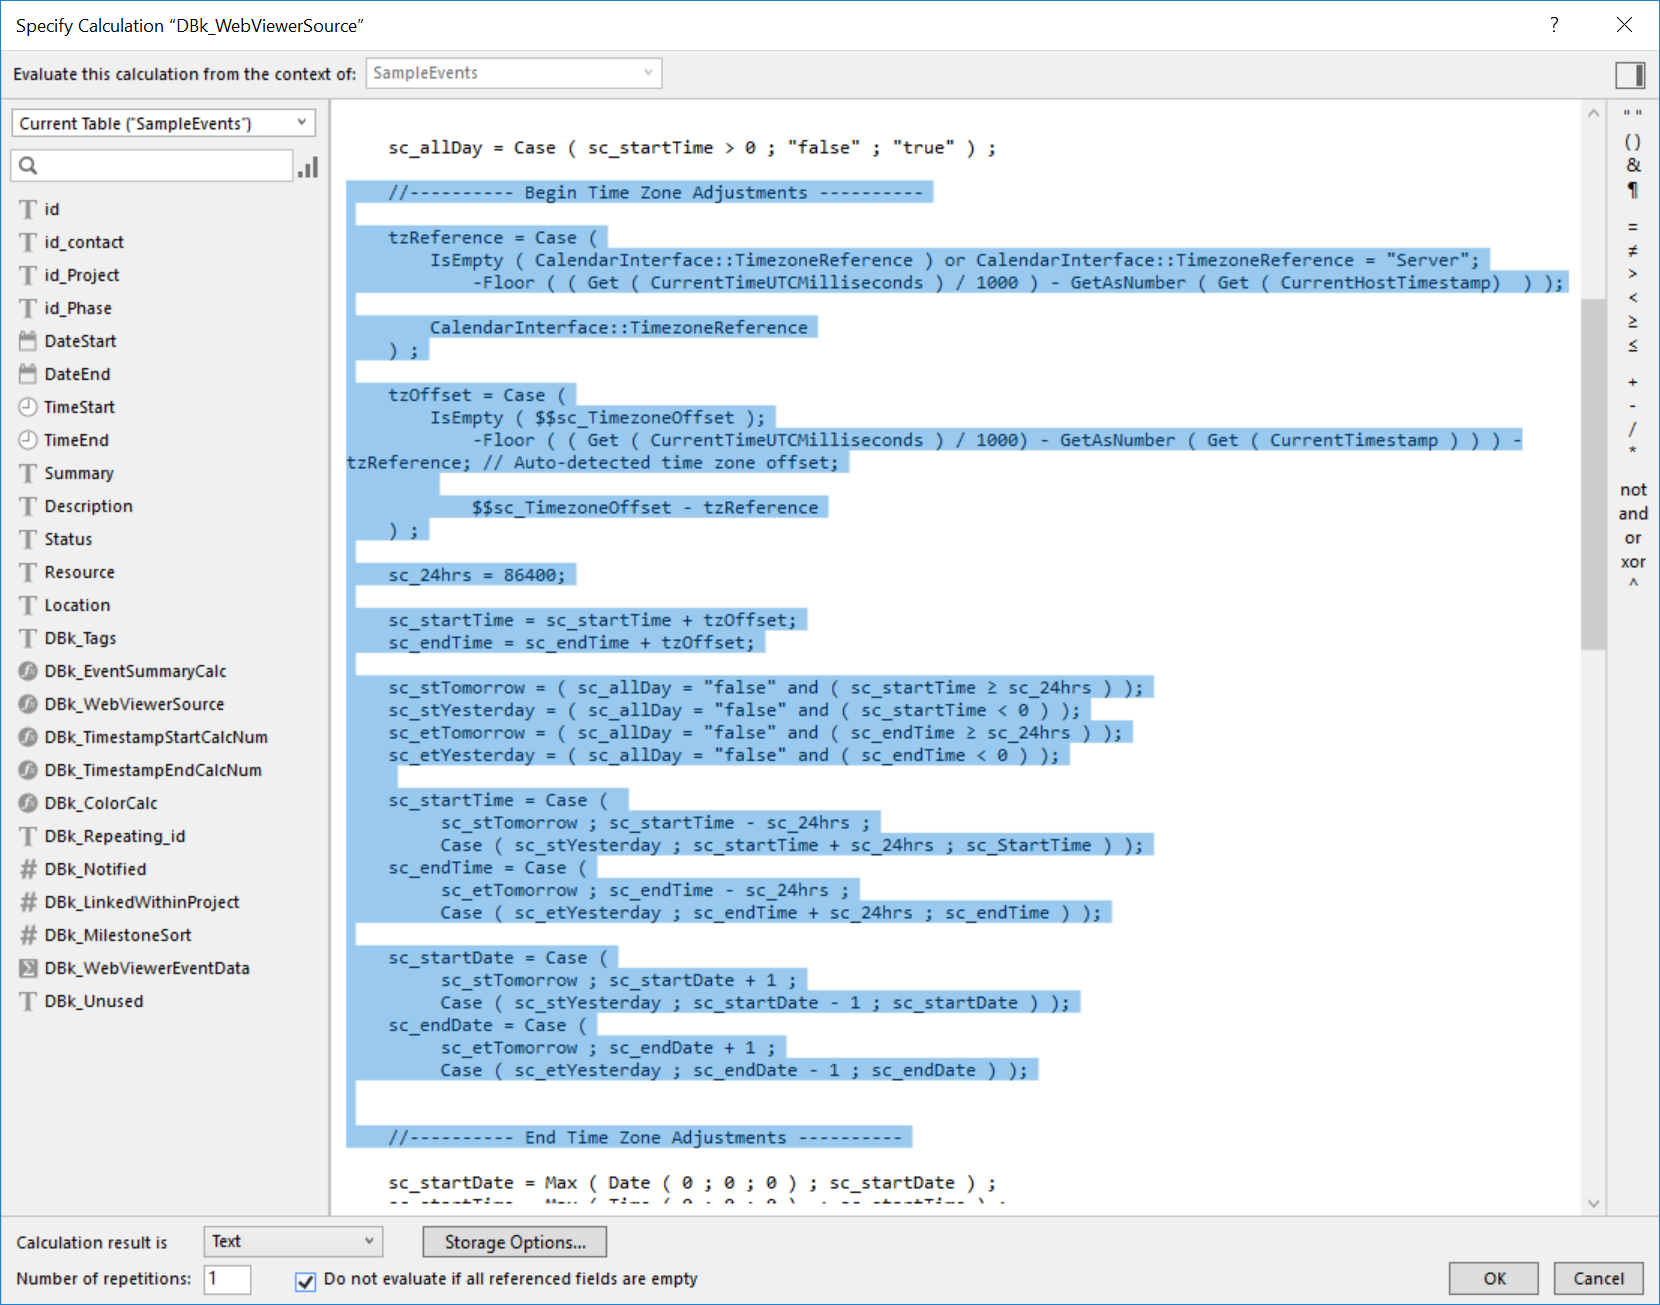
5. Copy the new section as pictured below from the DBk_WebViewerSource calculation in the SampleEvents table of the example file into each of your source tables’ DBk_WebViewerSource calculation. This will allow the calendar to display the events on the calendar adjusted for the time zone selected. This is commented out with “Begin Time Zone Adjustments” and “End Time Zone Adjustments” in the calculation. Do not replace the entire contents of this calculation, as you’ve likely made your own customizations to the variables that you don’t want to overwrite.
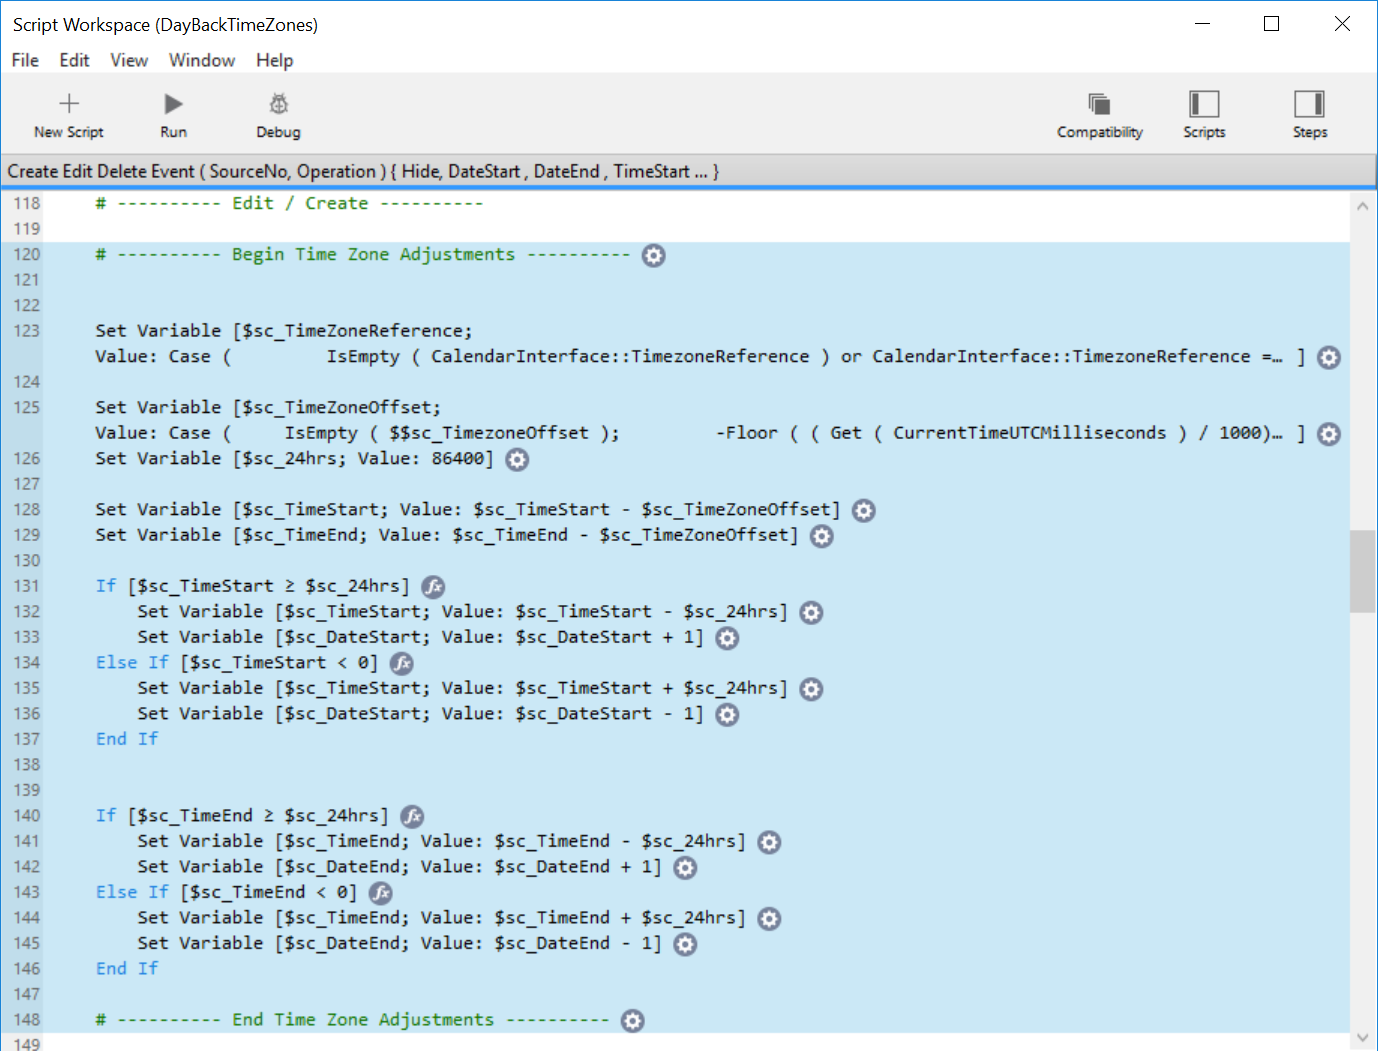
6. Copy the lines pictured below from the “Create Edit Delete Event…” script into your own “Create Edit Delete Event…” script, once again, commented with “Begin Time Zone Adjustments” and “End Time Zone Adjustments”. This will make sure that we’re writing the data back to the event adjusted for the time zone offset displayed on the calendar.
7. We need to allow for the new Web Viewer time zone selector to write back the time zone value to the $$sc_TimezoneSelected global variable so that the calendar can be adjusted accordingly. For this, we use the FMP URL protocol to call the “Set Timezone Offset from WebViewer” script in your file, so you’ll need to copy that script from the example file into your file. If you don’t have FileMaker advanced, you’ll need to create a new script in your file with the same name, then copy the contents of the script from the example file into this new script you’ve created.
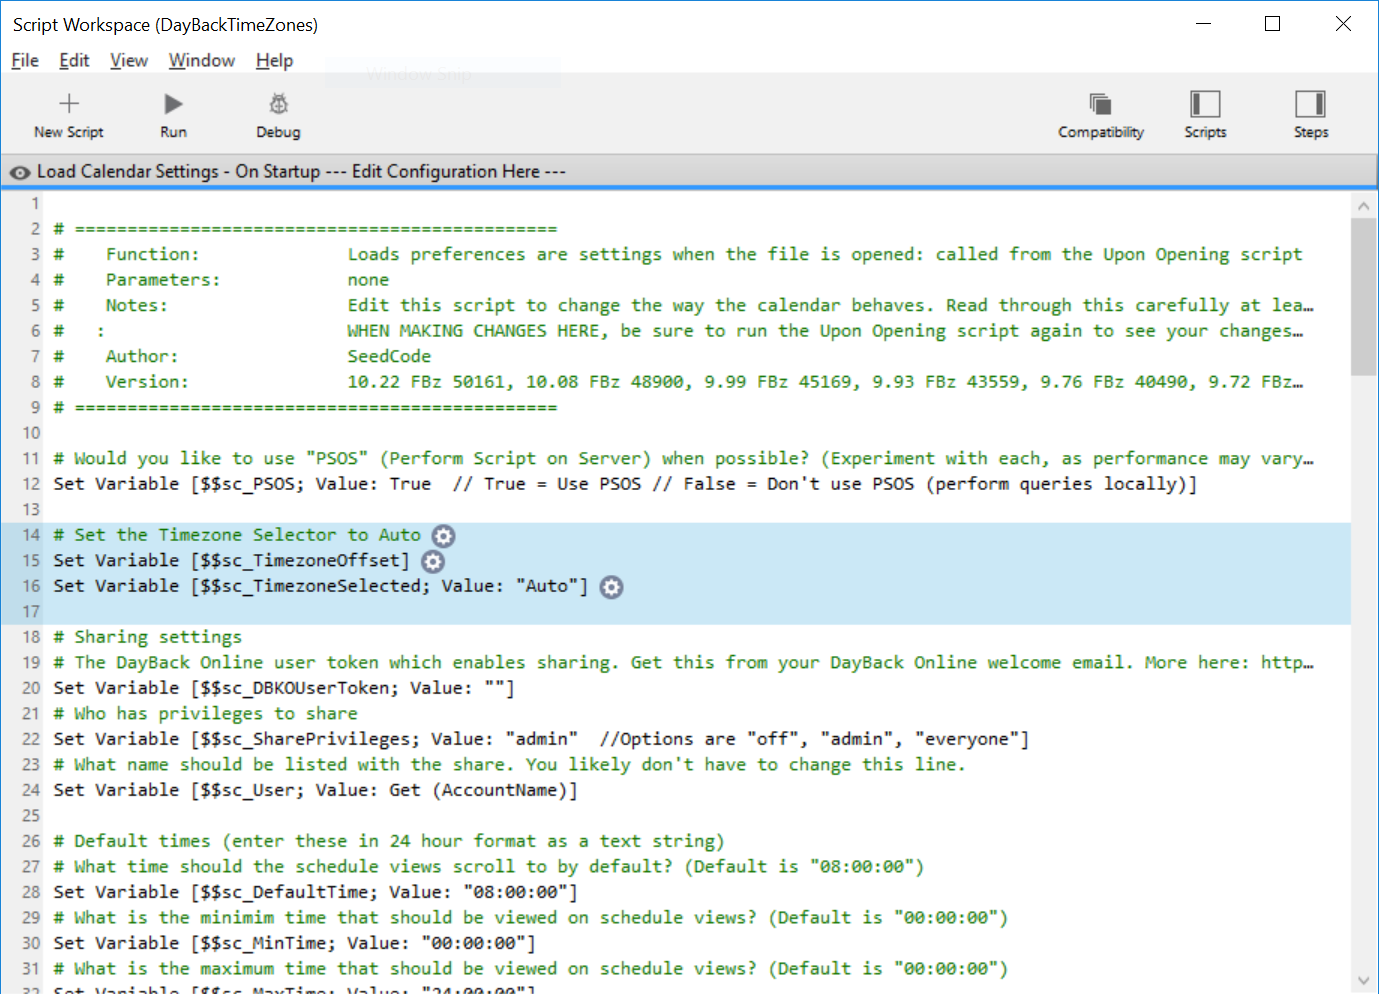
8. Finally, to finish it all off, we need to set the time zone global variable when the calendar first loads, so you’ll need to copy lines 14-17 of the “Load Calendar Settings – On Startup…” script from the example file, as pictured below, into the same script in your file.
Once you’ve completed these changes, you’ll just need to run the “Upon Opening” script to re-load the calendar and be off and running!
By default, the calendar will load according to your automatically detected time zone. To switch time zones, select a different time zone from the new selector above the calendar and watch the magic happen! The events will refresh according to the time zone you’ve selected, but when any changes are made, they will be saved according to the reference time you have selected.
Getting Help
If you’d like help customizing this mod, or creating other mods like this, feel free to contact us and we’ll get something scheduled.