
At SeedCode, we schedule most of our screen-shares with Zoom, so as part of streamlining our workflow we wanted to schedule these Zoom meetings directly from our calendar. Button actions in DayBack Calendar let you add your own buttons to events in the calendar. These buttons extend the calendar’s capabilities they’re great for connecting your calendar with third-party applications like Zoom.
Overview
![]() We created a middleware service that runs the majority of the logic and sends requests to the Zoom API. Using middleware keeps the custom actions in DayBack much more straightforward than they’d be if all the required JavaScript were in these button actions. While this service could be run on just about any server, we decided that this would be an excellent opportunity to take advantage of Zeit. Zeit lets you spin up small instances of server-side code, similar to containers, without having to deploy and configure an entire server to run it on. Working with Zeit has been a great experience and is looking like it could be a pattern for future FileMaker API integrations.
We created a middleware service that runs the majority of the logic and sends requests to the Zoom API. Using middleware keeps the custom actions in DayBack much more straightforward than they’d be if all the required JavaScript were in these button actions. While this service could be run on just about any server, we decided that this would be an excellent opportunity to take advantage of Zeit. Zeit lets you spin up small instances of server-side code, similar to containers, without having to deploy and configure an entire server to run it on. Working with Zeit has been a great experience and is looking like it could be a pattern for future FileMaker API integrations.
I write a bit more about the technical side of this middleware (called DayBack Meetings Service) and Zeit further down in this post. You’ll also find downloads and a FileMaker example file that contains all the code you’ll need to add this to your own copy of DayBack Calendar.
Schedule Zoom Meetings from FileMaker
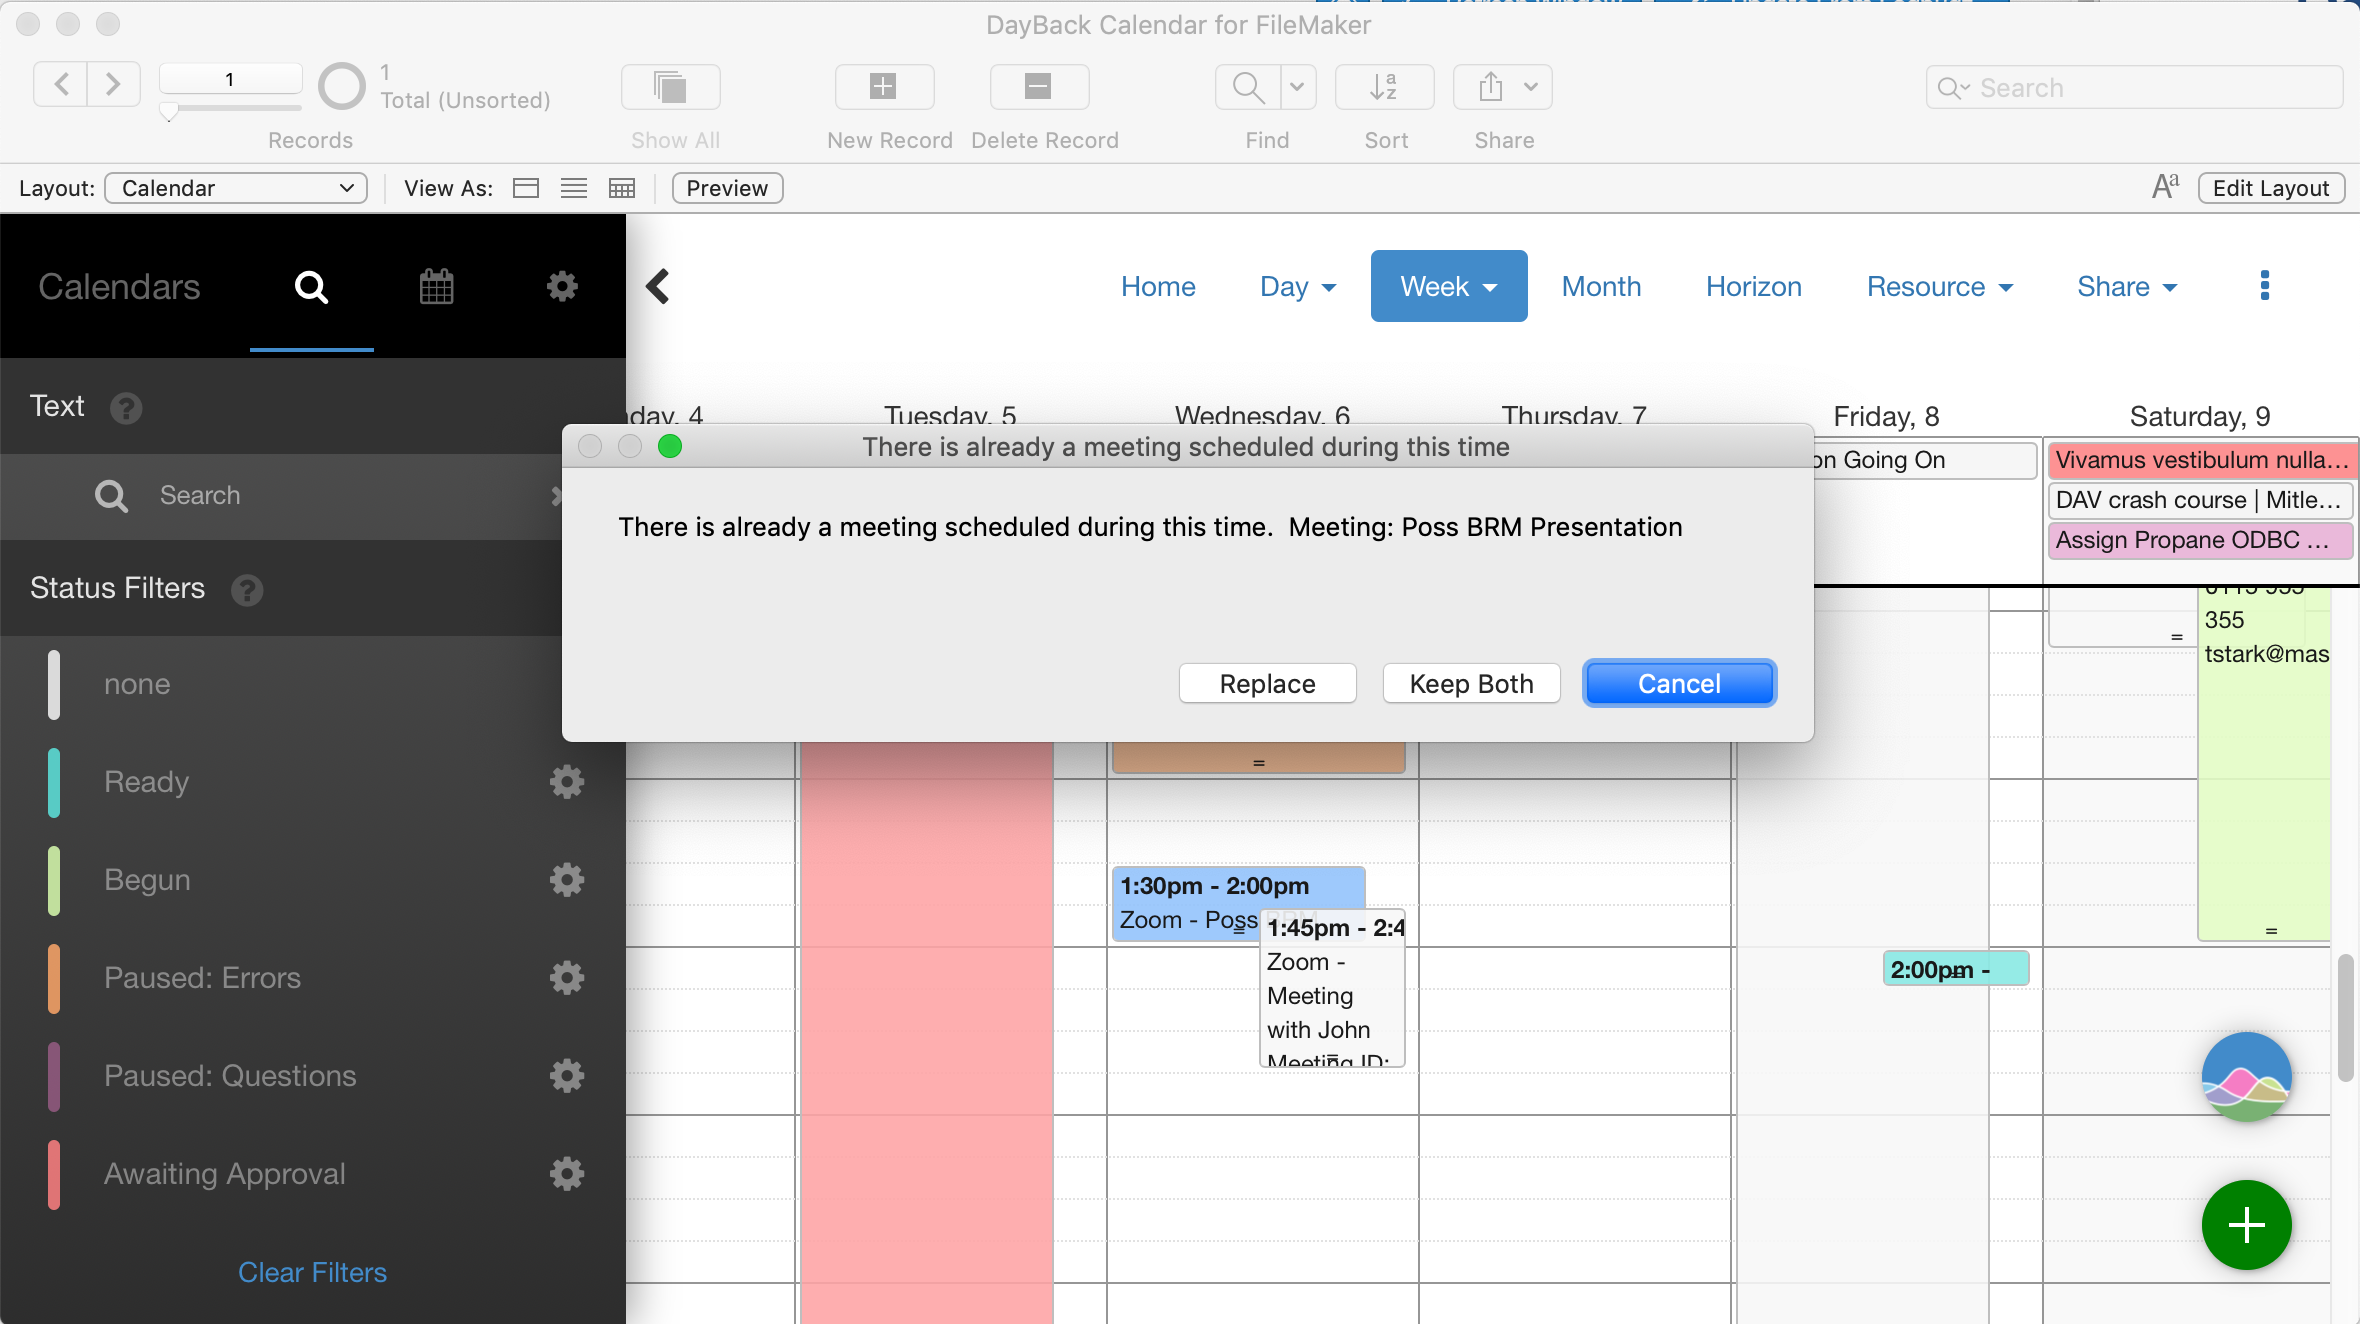
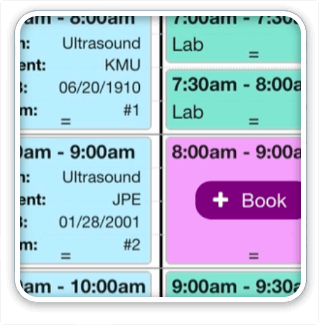
We’ve created buttons to schedule, start, and delete meetings. These actions also listen to DayBack events and reschedule Zoom meetings when you drag a meeting to a new time; they’ll also warn you if your new meeting time conflicts with another Zoom meeting.
Here’s a video of it in action: https://vimeo.com/314570405
Benefits – Visual Rescheduling & Conflict Detection
Seeing your Zoom meetings in the context of your other commitments is the whole point of working with Zoom inside DayBack. It’s even more important when rescheduling meetings: drag your meeting to a new spot on the calendar and DayBack checks to make sure there are no conflicting Zooms at that time.
If you’re using more than one Zoom account, DayBack keeps track of which account is used for each meeting and only considers meetings within the same account to be conflicts.
(Need conflict detection more broadly in your FileMaker calendar–not just for Zoom meetings? Check out this mod to DayBack Calendar: conflicting events in FileMaker.)
DayBack Meetings Service
Recently, Zoom deployed their latest version (v2) of their API. For security reasons, they also disabled their older v1 API, rendering the original DayBack – Zoom Custom Actions non-functional. With the new requirements of the API and desired improvements to the custom actions, this turned out to be quite a project, which now involves a middleware service.
We’re calling this the DayBack Meetings Service.
Why is this “service” needed in the first place?
We designed this service to work in both DayBack for FileMaker and DayBack Online. When connecting to external servers using JavaScript, modern browsers look for a header called “Cross Origin Resource Sharing,” or CORS, which specifies the origin domain that a request can come from. If the current domain is not included in this header, the browser will block any requests to that server from completing.
Zoom’s API does not support CORS in that it returns no CORS header, so these requests to the Zoom API cannot originate from browser-side JavaScript (like from the inside of a web viewer) and must instead come from a server-side service.
Initially, the plan was to develop a proxy service that merely forwarded the requests from the custom actions in DayBack to the Zoom API, and relayed the response right back to the browser. However, I also saw the possibility of having a middleware service that runs the majority of the logic and requests to the Zoom API, which means the button actions in DayBack could be simplified. Additionally, using middleware allows changes to be made to the service when updates are made on the Zoom API side (such updates are not infrequent) without requiring DayBack users to make any changes to their button actions.
Finally, having a service like this allows us to add additional features or connections to additional screen-share APIs, such as GoToMeeting, without requiring different custom actions on the DayBack end. Currently, only Zoom is supported, but we plan on adding GoToMeeting support soon. If there’s an app you use for screen-shares that you’d like to be able to schedule directly from DayBack, please reach out so we can create a feature request for adding this to the service in the future.
We built this service in Node.js and are hosting it using Zeit.
Why Node.js?
JavaScript is a language that we’re very familiar with, and it made sense to implement both the server-side code and the browser code using the same language. Node.js is the server-side implementation of JavaScript that supports most of the same features as browser-side JavaScript. With the abundance of training material available for Node and the similarity to client-side JavaScript, this seemed like the most accessible language for this service.
Why Zeit?
Zeit is a great way to spin up small instances of server-side code, similar to containers, without having to deploy and configure an entire server to run it on. Using Zeit, we can also provide instructions telling you exactly how to deploy your own private instance of the DayBack Meetings Service. This happens without needing to set up your own server and manage networking to make it happen. Just download the files, set your Zoom API Key and Secret, and deploy your own personal instance of the service.
Adding the DayBack Meetings Service to your FileMaker solution
This next part goes over the details to add the Zoom custom actions to your FileMaker DayBack solution. If you’re looking to integrate Zoom with DayBack Online or for Salesforce, details can be found on the blog post here.
Communication between DayBack in your browser and Zoom’s servers requires connecting through the DayBack Meetings Service. This service does not store any data and is only used to create, update, and delete events in your Zoom account. However, if you’d prefer to host this service on your own, instructions for that can be found at the bottom of this post.
Here’s how to add this capability to your copy of DayBack for FileMaker.
1. Download the example file
The example file (download it here) contains a trial version of DayBack for FileMaker with the Zoom custom actions already integrated. The scripts in this example file use the new JSON features to pass script parameters and advanced Insert From URL features introduced in FileMaker 16, so in order for this to work in your solution as-is, you’ll need to be running FileMaker 16+ on all your clients.
These buttons run FileMaker scripts, so you’re able to dive in and modify them as you please, although you can use the scripts you’ll download here with no modification.
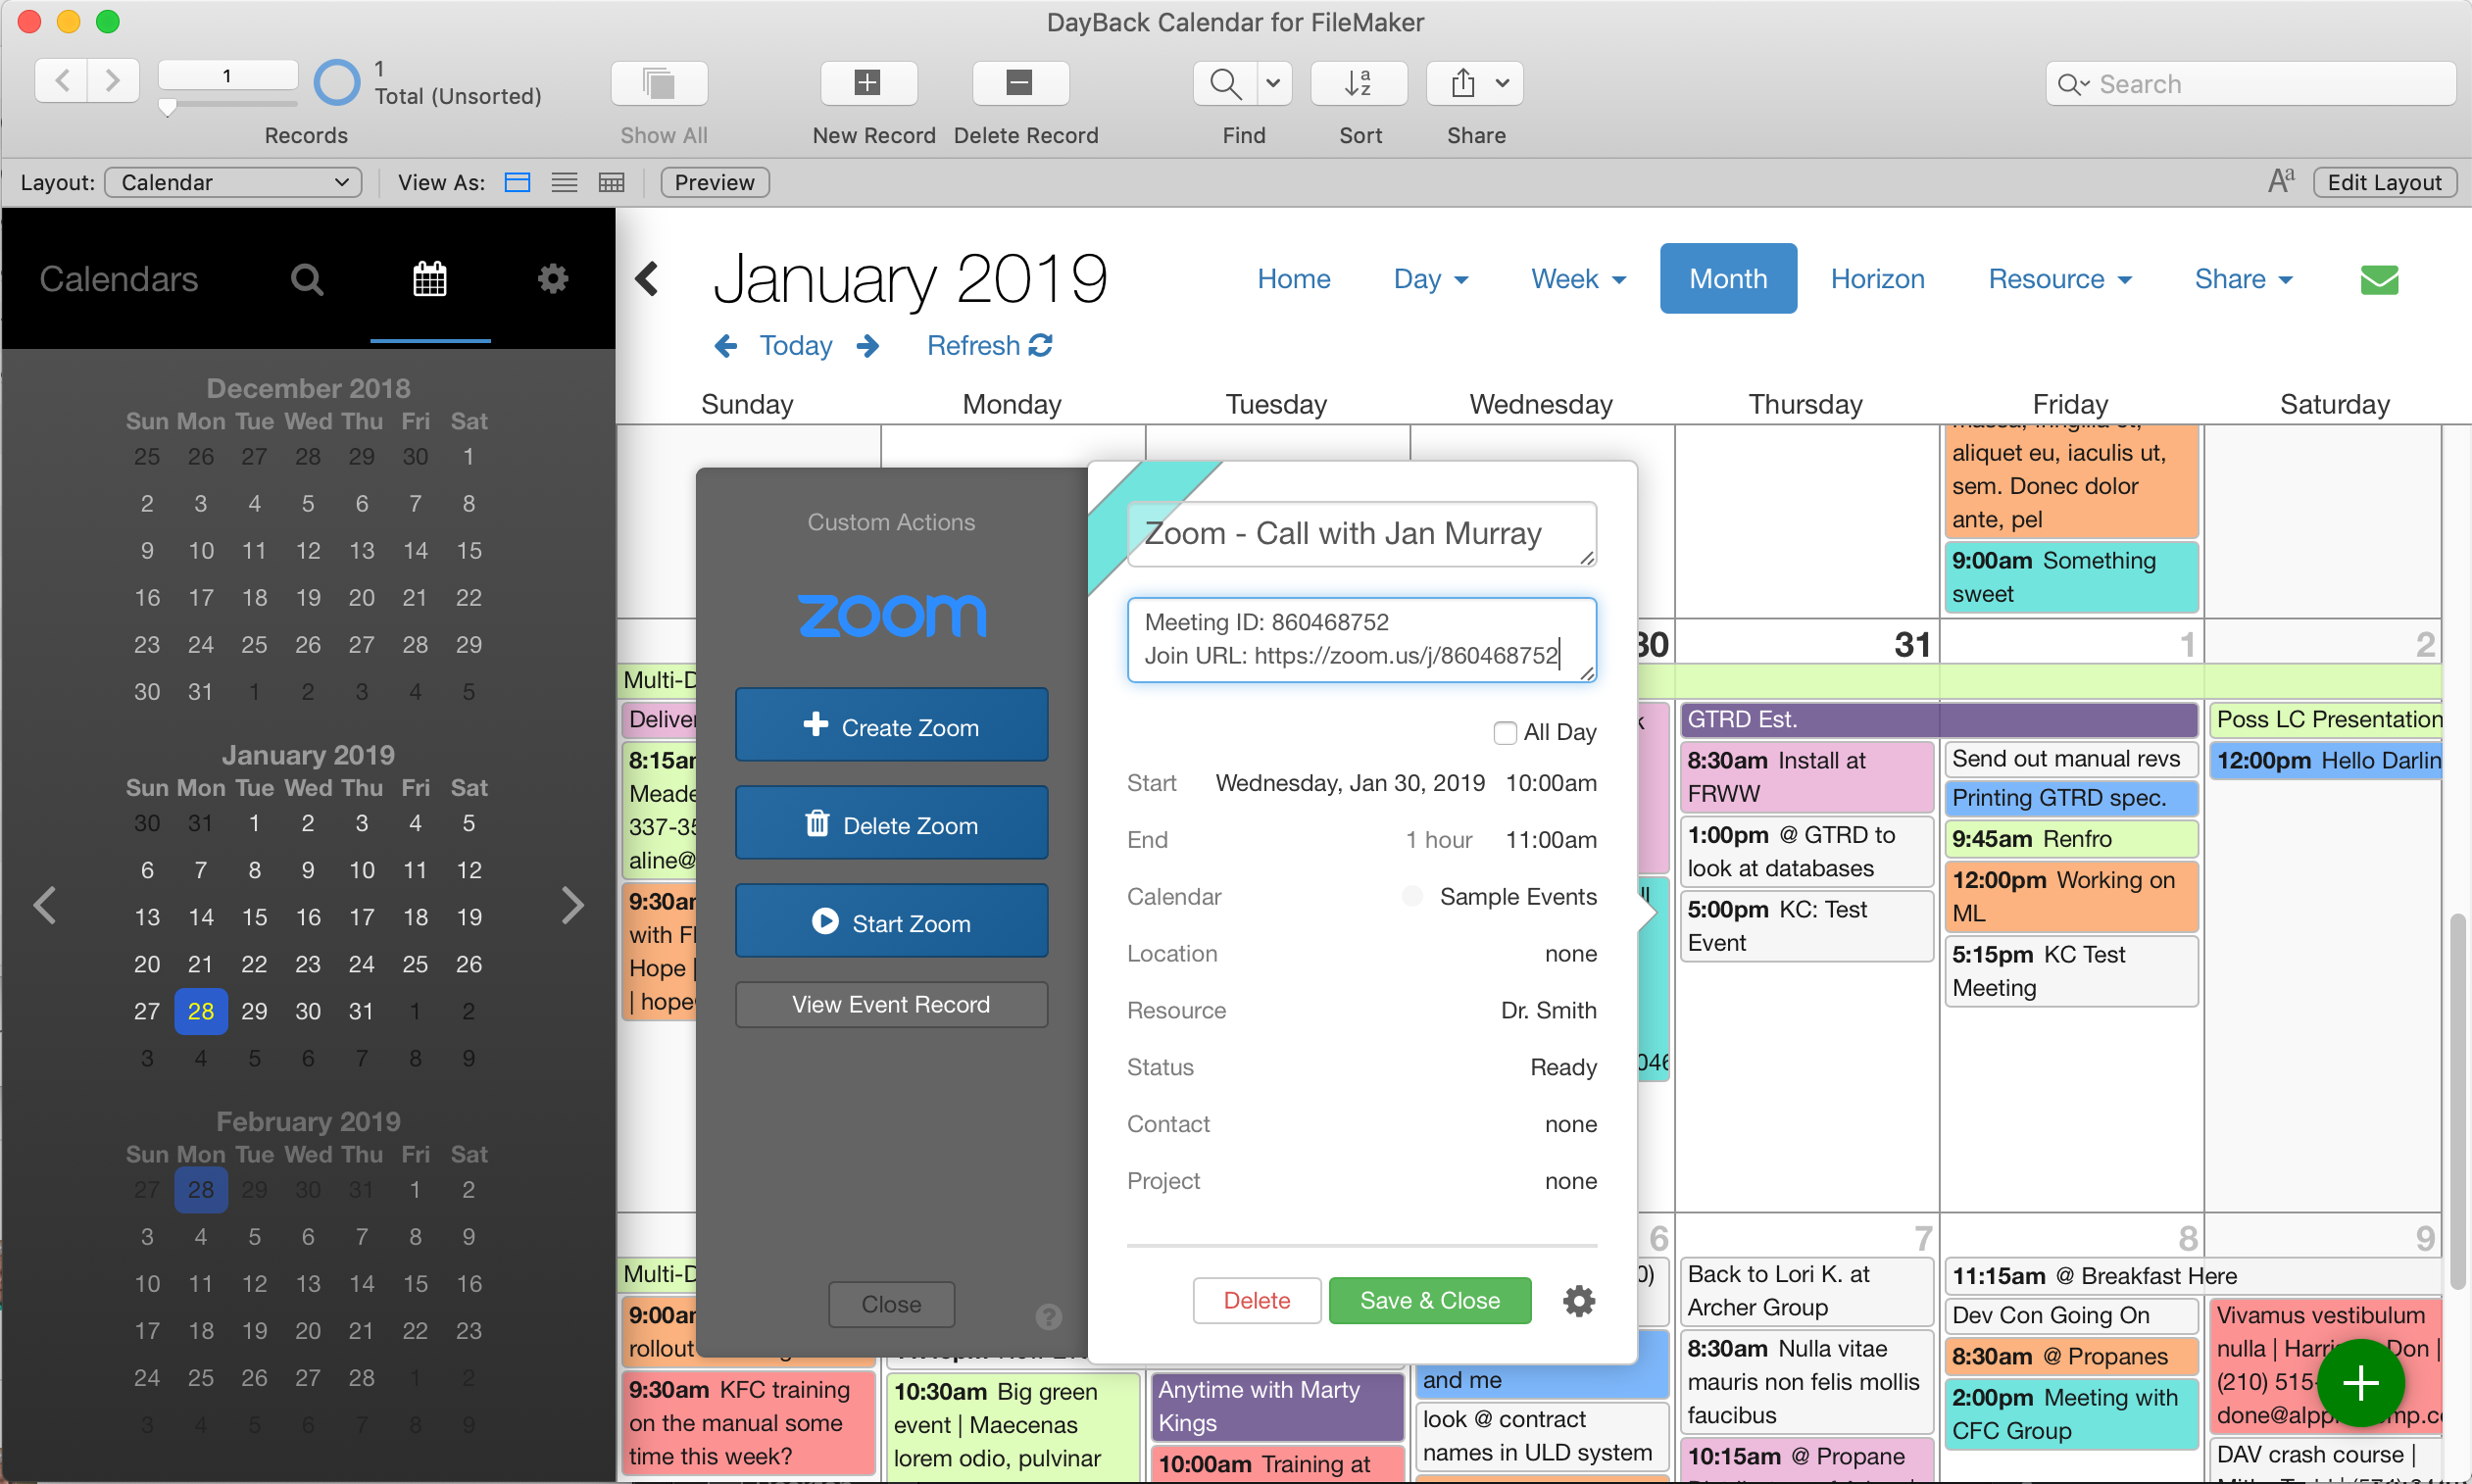
The fully featured integration shown in the movie above requires four button actions and two customizations that happen when events are modified or saved, giving you conflict detection and resolution, and making sure rescheduled events sync to Zoom. You’ll need to copy the following button action data from the “$$sc_CustomActions[$sc_SourceNumber]” variable on line 35 to the same variable for each source you’d like to be able to communicate with Zoom:
- Create Zoom – Handles the creation of new meetings
- Delete Zoom – Handles the manual deletion of existing meetings
- Start Zoom – Starts a meeting if the details exist in the event description
- Deauthorize Zoom – Deauthorizes DayBack from your Zoom account
2. Add the optional CSS styling for the buttons
We’ve added some lines to the CSS theme to give the Zoom buttons the nice styling that we have in the example file. Here’s the CSS if you’d like to add it to your file:
/*ZoomClasses*/
    .zoomClass .btn {
    line-height: 2;
    background: rgb(39, 106, 161);
    background: -moz-linear-gradient(-45deg, rgb(39, 106, 161) 0%, rgb(24, 91, 146) 100%);
    background: -webkit-linear-gradient(-45deg, rgb(39, 106, 161) 0%,rgb(24, 91, 146) 100%);
    background: linear-gradient(135deg, rgb(39, 106, 161) 0%,rgb(24, 91, 146) 100%);
    background: -o-linear-gradient(-45deg, rgb(39, 106, 161) 0%, rgb(24, 91, 146) 100%);
    background: -ms-linear-gradient(-45deg, rgb(39, 106, 161) 0%, rgb(24, 91, 146) 100%);
}

.zoomClass .btn:hover {
    background: rgb(11, 76, 131);
    background: -moz-linear-gradient(-45deg, rgb(11, 76, 131) 0%, rgb(16, 81, 136) 100%);
    background: -webkit-linear-gradient(-45deg, rgb(11, 76, 131) 0%,rgb(16, 81, 136) 100%);
    background: linear-gradient(135deg, rgb(11, 76, 131) 0%,rgb(16, 81, 136) 100%);
    background: -o-linear-gradient(-45deg, rgb(11, 76, 131) 0%, rgb(16, 81, 136) 100%);
    background: -ms-linear-gradient(-45deg, rgb(11, 76, 131) 0%, rgb(16, 81, 136) 100%);
}

.zoomClass .btn:active {
    background-color: black;
}

.zoomCreate {
    margin-top: 65px;
}

.zoomCreate .btn {
    height: 38px;
}

.zoomCreate .btn::before {
    content: "\f067";
    font-family: FontAwesome;
    font-size: 16px;
    padding-right: 7px;
}

.zoomCreate:before {
    content: url("http://www.seedcode.com/zoom_logo_resized.png");
    transform: scale(0.5);
    position: absolute;
    left: 4px;
    top: 12px;
}

.zoomStart .btn::before {
    content: "\f144";
    font-family: FontAwesome;
    font-size: 16px;
    padding-right: 7px;
}

.zoomDelete .btn::before {
    content: "\f1f8";
    font-family: FontAwesome;
    font-size: 16px;
    padding-right: 7px;
}
3. Copy the authorization WebViewer layout to your DayBack solution
Add a new layout to your solution called “Authorization WebViewer”. In layout mode, remove the header and footer from the new layout and change its width and height to 200px.
Open the “Authorization WebViewer” layout in the example file and enter layout mode, select all the contents, and copy them. Paste these contents into the same layout in your file and save the layout.
4. Add the required new scripts to your DayBack solution
Copy or import the “DayBack Meetings Service” folder and all the scripts contained in it from the example file to your solution.
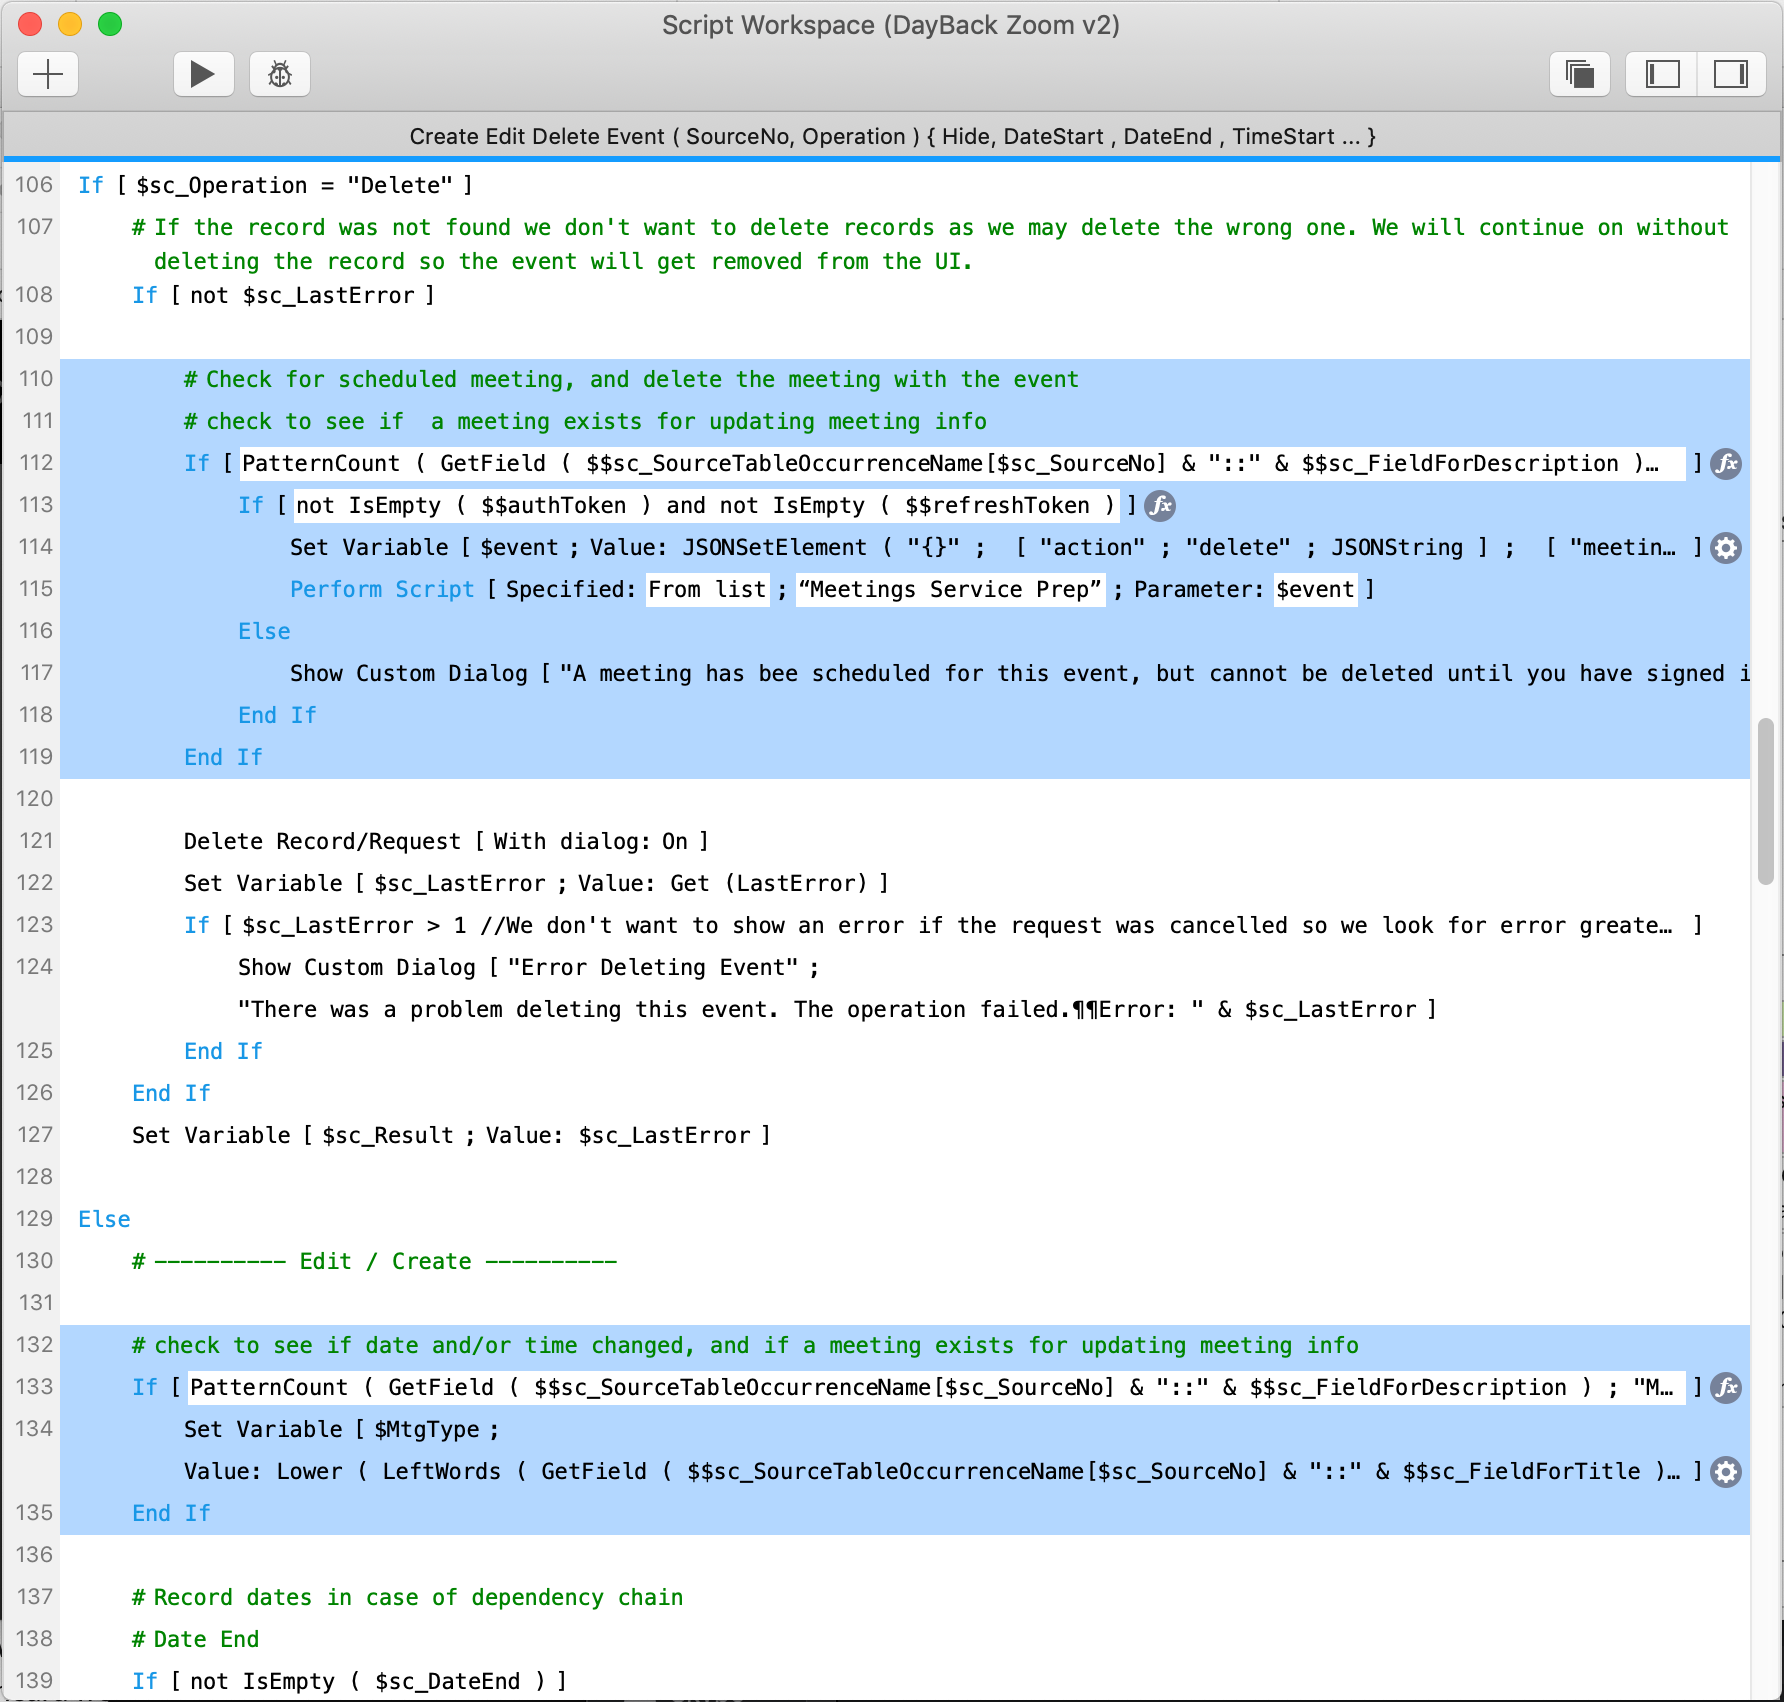
Copy the following highlighted script additions from the “Create Edit Delete Event…” script in the example file and paste them into the appropriate areas of the same script in your solution. This handles the meeting actions for when you reschedule or delete an event in the calendar.

5. Update the script for the “Close” button on the WebViewer layout
Open the “Authorization WebViewer” layout in your file again and enter layout mode to modify the “Close” button action and point it to the “Meetings Service Cancel Authorization” script.
Close the example file. then run the “Upon Opening” script to apply the changes to the source settings and re-load the calendar with the new button actions available.
Behavior
When you first try to create, edit, or delete a meeting through the DayBack custom actions, you’ll be presented with a login prompt that looks like this:

This is where you’re authenticating DayBack to connect to your Zoom account. Once you’ve logged in and authorized the DayBack Meetings Service with Zoom, you’ll be connected and the button actions will function without needing to authorize again.
Keep in mind that the actions will use the Zoom account that you’re logged in to with the browser (Safari for Mac, or Internet Explorer on Windows) to authorize with the DayBack Meetings Service. If you’re not already logged into Zoom in the browser, you’ll be prompted to log in when you use a custom action the first time.
If you need to change the account you’re using, you can click the “Deauthorize” button, and log out of Zoom in your browser. Once you use a Zoom custom action again, you will be prompted to log in to Zoom.
Hosting the DayBack Meetings Service Yourself
The DayBack Meetings Service is a small web service built in Node.JS. We built it to run as a Zeit application, so if you’d like to run it yourself, you’ll want to learn more and sign-up for a Zeit account here.
You’ll also need your own OAuth API credentials with Zoom in order to authorize your application.
1. Download the files
Deploying the files is quite easy. First, you’ll need to install “Now” from Zeit. Then, extract the “Service” folder from the files downloaded here to a location of your choice.
You can dive into and modify the “index.js” code all you’d like, but to start, it would be best to leave it as is for now.
2. Customize the service for your deployment
Next, open the “package.json” file, which contains the details for this service, and modify the values for “name”, and “description” appropriately. Name and description can be whatever you’d like to call your service.
Open the “now.json” file and change the “name” and “alias” appropriately. “Name” should match the same value you entered in your “package.json” file. The “alias” needs to be unique to Zeit and is the address you’ll point your custom actions to in the next step.
3. Add your Zoom API id and secret to your Zeit environment variables
Open a command prompt (Windows) or terminal window (Mac) and navigate to the folder where you extracted the files.
Next, enter the following commands, one at a time, replacing the last value with your id or secret provided by Zoom:
now secret add zoomID YOURZOOMID
now secret add zoomSecret YOURZOOMSECRET
This will securely save these values into your Zeit environment variables for use in the service without directly entering the values into the code. Any time you need to update/replace your Zoom API credentials, you can update the Zeit environment variables with the same commands
4. Deploy your service
Open a command prompt (Windows) or terminal window (Mac) and navigate to the folder where you’ve extracted the service files, and run the deploy.cmd (Windows) or deploy.sh (Mac) file to deploy your service. This will create a new private instance of the service and deploy it at the alias specified in your “now.json” file.
Once the deployment is complete, verify that your new service is running by going to the alias address you specified in a browser. If you see “DayBack Meetings Service Running”, your instance is up and running and ready to connect!
5. Point the DayBack Meetings Service scripts to your new service
The last step is to update the new scripts you added to point to your new instance address. On the “Insert from URL script step in the “Meetings Service Send Request” script (line 11), just change the URL property to the alias you specified earlier. Currently, it’s pointing to ‘https://daybackmeetings.now.sh‘ and you’ll just change it to ‘https://YourSpecifiedAlias.now.sh‘. Save that script and your custom actions will now be completely handled by your own private instance of the DayBack Meetings Service.

3 Comments
Wow, didn’t know it had to be more complicated than simply copy & paste into a schedule.
The demo should be, here’s the api, plug here & it works…instead it this long arduous sounding process
in which I want to run from…
Creating revenue vs spending my time in a calendar…should be effortless, too many connectors
> Creating revenue vs spending my time in a calendar
Man, I hear you.
Once the code is in place, scheduling Zooms in the calendar effortless. And pasting that code into your copy of DayBack is just that: simply pasting. The complicated stuff in blog post is really for developers who might want to use this approach to connect FileMaker to other services.
KC hosted a code party on this technique on Feb 22nd. If you weren’t able to attend, you can find the slides here: http://bit.ly/2IGpaU8 They tried to record this but only got the video, no sound =(